Are you ready for Google Analytics 4 (GA4)? In this blog post, we’ll be providing you with a step-by-step guide on how to set up for GA4 alongside your existing Universal Analytics. If you’re ready to get ahead of your competitors, keep reading!
Say Good-Bye To Google Analytics
If you haven’t heard, Google has announced that Universal Analytics, the original version of Google Analytics before GA4, will be discontinued in mid-2023.
If you haven’t had the chance to check out our blog post “Google is ending Google Universal Analytics in 2023,” where we provide all the info you need for Google Analytics 4 to help you prepare for the change.
Step-By-Step Guide
To create a Google Analytics on Air 4 property, follow these steps. The procedure is the same for whether your website pages have a Google Analytics tag (gtag.js or analytics.js). In addition, you must be an Editor for the account to utilize the GA4 Setup Assistant:
1. In Google Analytics, click Settings Admin (lower left).
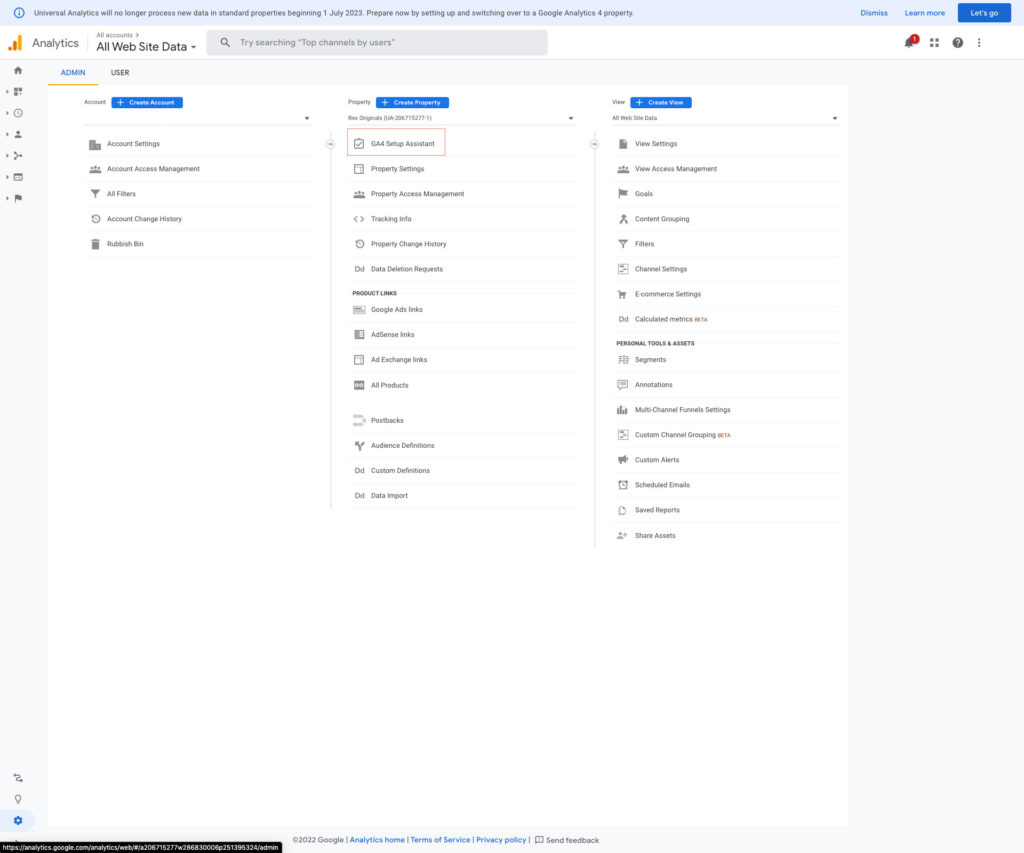

2. In the Account column, ensure that your desired account is selected. (If you only have one Google Analytics account, it will already be selected.)
3. In the Property column, select the Universal Analytics Property that currently collects data for your website.
4. In the Property column, click GA4 Setup Assistant. It is the first option in the Property column.
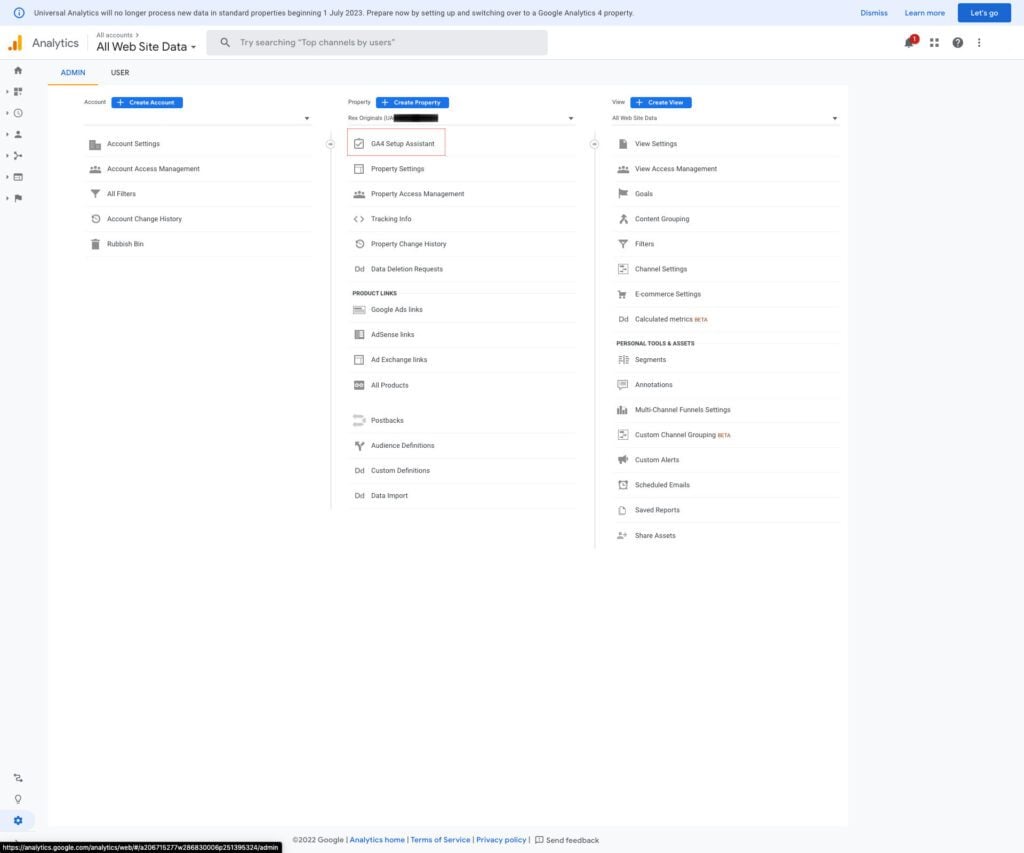

5. Click Get started under I want to create a new Google Analytics 4 property.


6. If your site uses the gtag.js tag, you have the option to Enable data collection using your existing tags.
- If you use a website builder/CMS that supports the gtag.js tag, such as WordPress, Shopify, Wix, etc., you can choose to enable data collection using your current tags.
- If your website builder/CMS does not yet support the gtag.js tag if you use Google Tag Manager, or your website is tagged with analytics.js, the wizard can’t reuse your existing tagging, and you’ll need to add the tag yourself (scroll down to “Find Your GA4 On-Page Tag” to learn how).
Note for advanced users: Enable data collection using your existing tags implements standard data collection for your GA4 property. If you’ve implemented any custom tags for your UA property, review these considerations for additional steps.
7. Click Create Property.
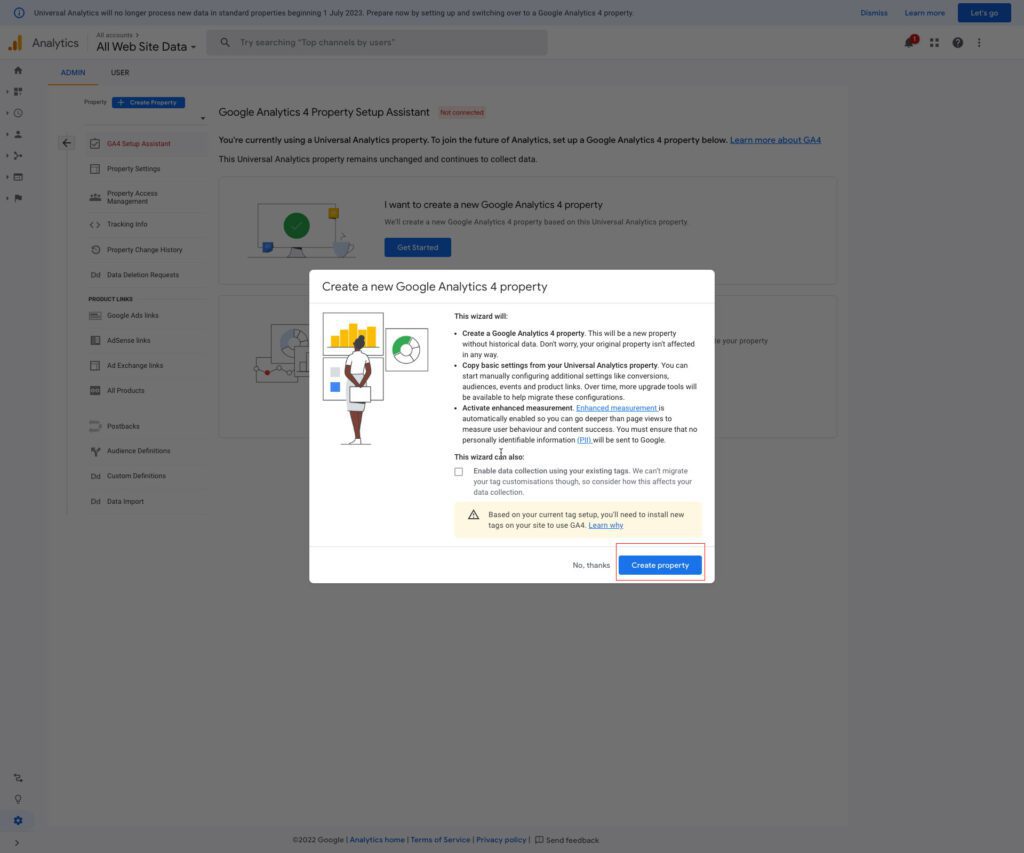

Once you click Create Property, the setup wizard:
- Creates your new GA4 property.
- Copies the property name, website URL, timezone, and currency settings from your Universal Analytics property.
- Activates enhanced measurement in your GA4 property.
- Creates a connection between your Universal Analytics and GA4 properties. This connection makes it possible for you to use Setup Assistant in your Google Analytics 4 property to migrate configurations from your Universal Analytics property to your GA4 property.
- (If your site is tagged with gtag.js and you elected to Enable data collection using your existing tags in Step 6 above) Creates a connected site tag between your Universal Analytics and GA4 properties.
Once this process is complete, you will see “You have successfully connected your properties” at the top of your Google Analytics 4 Property Setup Assistant page.
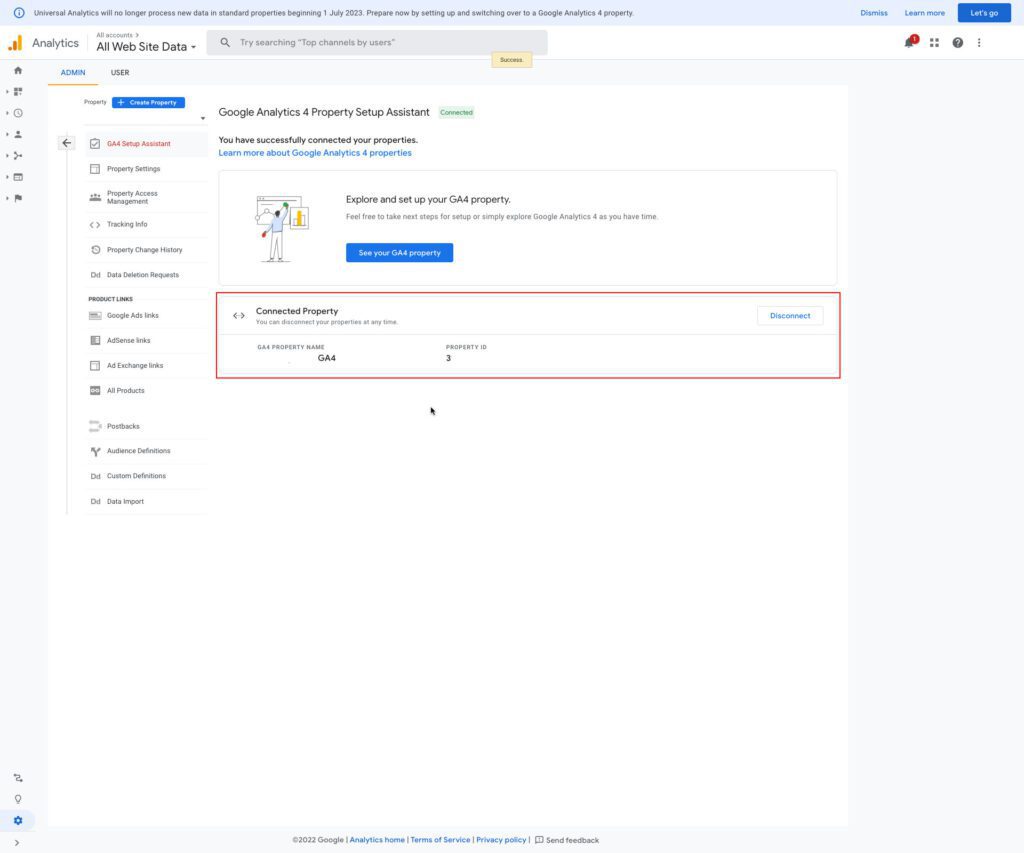

Please make a note of your GA4 property’s name so you can find it later. For example, if your Universal Analytics property name is “Example property (UA-nnnnnnn),” your GA4 property name will be “Example property (xxxxxxx),” without a “UA-” prefix, and where xxxxxxx is a new property number. Click See your GA4 property to open Setup Assistant in your new GA4 property.
Why Setup Your Google Analytics 4 Property Assistant
The Google Analytics 4 Property Setup Assistant is a page that you can find from your Google Analytics 4 property’s Admin area. It describes the procedures required to set up your Google Analytics 4 property. Use Setup Assistant to transfer your Universal Analytics settings from one Google Analytics 4 property to another if you already have a Universal Analytics property connected to it.
Setup Assistant in your Google Analytics 4 property looks like this:


If The Setup Wizard Did Use Your Existing Tagging
If you enabled data collection using your existing tags, your new GA4 property should now be collecting data.
It can take up to 30 minutes for data to appear in your new GA4 property.
To ensure that data is being collected, browse your website and select Realtime from the report navigation. You should see activity in the Realtime report.
If you have an existing Firebase project, you can link this GA4 property. However, you have to do this from Firebase.
How Do You Link GA4 to Firebase?
Update Settings After Creating The Link
After you create a Google Analytics 4 property and establish the link to your Firebase project, you have options to:
- Adjust the access level for Firebase users to Analytics data
- Turn off enhanced audience integration (the feature is on by default)
To open these settings:
- Click Admin
- At the top of the Property column, use the dropdown selector to select the property you want to edit.
- Under PRODUCT LINKS, click Firebase Links.
- Find the row for the relevant Firebase project ID.
User Access (Roles In Analytics)
When you link a Firebase project to an Analytics property, it creates a new Analytics role for all of your project’s users.
- Firebase users in a project, based on their highest Firebase firebase analytics permission, are assigned to one of two Firebase virtual users:
- Firebase project <project number> Editor
- Firebase project <project number> Viewer
- The Firebase virtual users are, in turn, assigned to default roles in the linked Analytics property.
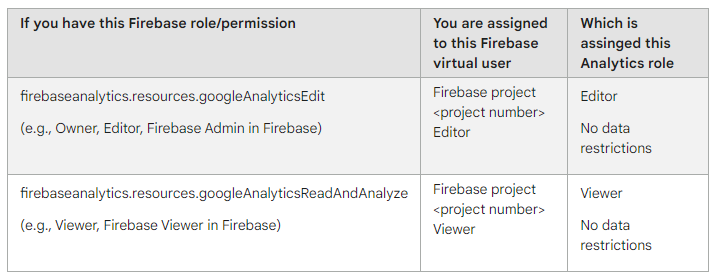

Each Firebase virtual user is a collection of users in the connected Firebase project, as shown in Analytics access management.
As an Analytics Administrator, you may modify the Analytics role and data restrictions that are assigned to a property’s Firebase virtual users. A change in the Analytics role and data restrictions assigned to a Firebase virtual user affects all people in the project who are associated with it.
The assignments and data limitations are saved in the Firebase project until the link between the project and the Analytics property is deleted.
Analytics Administrators can edit access for the Firebase roles in Admin > linked property > Property Access Management.
For example, you may limit user access to financial and cost data in the Firebase Console if they don’t need to see it:
- In Admin, ensure that you have the desired account and property selected.
- In the Property column, click Property Access Management.
- Next, click the row for the Firebase user whose data access you want to restrict.
- Under Data restrictions, select No Cost Metrics and/or No Revenue Metrics.
If The Setup Wizard Did Not Use Your Existing Tagging
If you tagged your site with analytics.js (instead of gtag.js) or if you use a website builder/CMS that tags your pages with analytics.js, then the GA4 Setup Wizard was not able to reuse your existing tagging.
If you’re not using a website builder/CMS, you or your web developer can use whatever page editor you like to add the GA4 gtag.js tag directly to your pages. Leave the analytics.js tag in place so that Analytics still sends data to your Universal Analytics property.
Using a website builder/CMS that tags your pages with analytics.js, you can use the custom-HTML feature to add the GA4 gtag.js tag to your pages. Leave the analytics.js tag in place so that Analytics still sends data to your Universal Analytics property.
Find your GA4 On-Page Tag
Your new GA4 on-page tag is located on the details page for the web data stream for your GA4 property. If you don’t see a Data Streams link in the Property column, you are looking at the Admin page for a Universal Analytics property instead of your new GA4 property.
- Click Settings Admin (lower left).
- In the Property column, check that you have your new GA4 property selected, click Data Streams, then Web. Click the data stream.
- Under Tagging Instructions, click Add new on-page tag > Global Site Tag (gtag.js). Your Analytics page tag is the entire section of code that appears, beginning with:
<!– Global Site Tag (gtag.js) – Google Analytics –>
and ending with
</script>
If You Or Your Web Developer Are Manually Tagging Your Web Pages
Copy and paste your entire Analytics page tag immediately after the <head> tag on each page of your website.
Don’t remove the old analytics.js tag; it will continue to collect data for your Universal Analytics property. Likewise, the gtag.js tag that you’re adding will collect data for your new GA4 property.
Use the Realtime Report to verify that you’re receiving data.
What is Google Analytics 4 (GA4) Realtime Report?
“Realtime lets you monitor activity on your app or site as it happens.”
The arrangement of cards lets you see how users enter the conversion funnel and how they behave once they’re in the funnel:
- The number of users during the last 30 minutes (per minute)
- Users by source, medium, or campaign: where your users are coming from
- Users or new users by audience: who your users are
- Users by page title or screen name: which content they engage
- Event count by event name: which events they trigger
- Conversions by event name: which conversions they complete
The Realtime report will show you how you acquire users. This includes the dimensions and metrics that are specific to you.
Access The Real-Time Report
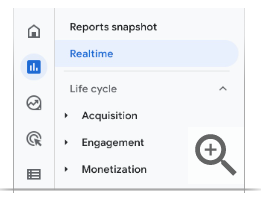
To access the Realtime report, click Reports > Realtime in the left navigation.

Ways To Use Realtime
You may use Realtime to track the impact that new campaigns and site changes have on your traffic right now:
- See if a one-day promotion gets more people to visit your website or app.
- If you post about your business on a blog or social media, watch how the traffic changes.
- Monitor how changes to your website impact traffic.
- Make sure the tracking code on your website or app is working correctly.
Comparisons
Compare subsets of your data to see how they compare to each other. For example, compare users 18-24 to your overall user base, or compare two different campaigns to each other:
Click to ![]()
![]()
Click on one of the bubbles on the map to compare all users to users in that particular city.
User Snapshots
Click View user snapshot at the top of the report to see a snapshot of data for a single user.
A snapshot includes information about a user’s device, app version, and location. The snapshot also provides information about the user’s top events and any other relevant information about the user.
Click the arrows in the first card at the top of the report to change the snapshot from one user to another.
Things to keep in mind
User processing
Realtime allows you to see:
- ‘Users in Last 30 Minutes‘, This shows all the people who are using your website or app.
- ‘New users,’ which shows new users on your site or app.
- ‘Users,’ this shows you the people who Analytics has processed.
The number of users shown on the page excludes new users and people who have not been processed yet.
App data
Your phone saves battery by collecting data in batches. As a result, you may sometimes notice a delay between when you take action and when it appears on your screen. Batching usually happens every few minutes.
No data
If you don’t see any data in your Real-time report, there may be no active users.
Congratulations, now you’re all set up for Google Analytics 4 (GA4)!
If you’re not already using Google Analytics, now is to start. Universal Analytics will be discontinued in mid-2023, so make sure you sign up for the new platform before it’s too late. The new Google Analytics interface is simplified and more powerful, making it easier to track your website traffic and analyze your data. Plus, with increased privacy protection, you can feel confident that your data is safe and secure.
Don’t wait – sign up for Google Analytics today!

